Showing posts with label cheese. Show all posts

Thursday, April 15, 2010

Easy Appetizer: Cheesy Ham Bites

The same night I made my 5-Minute Fudgy Brownies for some friends in our Sunday School class, I made these super quick and easy appetizers. I don't know why but I just love crescent rolls from the can. When we were growing up, and my mom would make them as a quick side dish with our meal, there'd be 8 of them in the bread basket and 4 of us at the table. My sister would always ask, "Now, how many have you had?" to each of us to make sure that we weren't taking any more than our allotted 2 crescent rolls. If one of us decided we just wanted one, she'd, of course, snatch the extra up as her third. Then, to make matters more annoying, she'd suddenly have to go to the bathroom when the table needed to be cleared and the dishes done. I would be stuck with doing everything and, magically, just as the last dish was getting dried she'd be done in the restroom. How lovely for her, right? I'm not bitter, really. But I digress. Everyone at dinner really enjoyed these little pockets of deliciousness and they were gobbled up almost as soon as they were on the platter...hence the lack of pictures beyond the baking sheet! Enjoy and try to snap a picture or two before your guests arrive and gobble the bad boys up!

Cheesy Ham Bites
Source: Me
Yields: a lot

2 packages crescent rolls
2 packages Carl Buddig cooked ham lunch meat
2 cups shredded sharp cheddar cheese
ketchup and mustard for dipping

Preheat oven to whatever it says on the can...probably 375. Cut each triangle of crescent roll dough into two so you end up having 32 small triangles (8 rolls per can, each cut into 2 for 16 triangles).


Chop up the lunch meat into small squares. Using your thumb and first two fingers, grab a small amount of ham and put it in the center of the crescent roll triangle; do the same with the cheese.


Fold the top corner towards you over the cheese, then fold the two side corners up over that.


Pinch the openings together so you have a fat little stuffed triangle. Arrange on your largest cookie sheet in nice, tidy rows (as opposed to chaotic rows like my sister would do). :-) Bake for about 8-10 minutes, or until crescent rolls are golden brown. Serve with a side of ketchup and mustard for dipping.

Tuesday, February 16, 2010

Buffalo Blue AND Cheese Pizzas

I don't know why but I love spicy foods. I love spicy salsa and I especially love spicy wings. I love the fact that the hot sauce makes me perspire and I love chasing the hot sauce with bread and other sorts of things to try to calm down my tongue. No one understands why I torture myself because it'd be just as easy to not partake in the brouhaha that is my mouth once I'm finished eating. Nevertheless, I'll just continue doing it to myself! I got this recipe from Cooking in Cucamonga but I knew I'd have to do something different for Computer Man who loathes any and all things spicy. Luckily, everything worked out wonderfully in the end: I was able to painfully enjoy my spicy pizza and he devoured his plain cheese pizza (which he, of course, ate alongside a plate of Hawaiian wings). You can totally nix the plain cheese pizza and double everything (except the crust and shredded cheese) to make one large Buffalo Bleu pizza. Enjoy!

Pizza Night! (Buffalo Bleu and Cheese Pizzas)

1 pizza crust
2 cups shredded cheddar and jack cheese
a few crumbles of bleu cheese (less than 1/4 c)
less than 1/4 c bleu cheese dressing
2 green onions, chopped
1 chicken breast, grilled and shredded or diced (I used a George Foreman grill)
4 T hot wing sauce (or more if you want)
1/4 c pizza sauce [not used on the Buffalo Bleu pizza]

Preheat oven to 500 degrees and put the pizza stone in there while it heats up; allow pizza stone to heat for at least 30 minutes--you can prep the pizza while it warms up.

Divide the dough in half and flatten out each half on a piece of floured parchment paper. On one of half, spread the pizza sauce and sprinkle with cheese. You're done with that pizza.

For the other pizza, things are a bit more involved. Mix 2 T of the wing sauce and the bleu cheese dressing together; spread on pizza dough. Mix the grilled chicken with the rest of the wing sauce in separate bowl (I added more of the spicy goodness in this step because I wanted to!). Put the chicken on the dough. Sprinkle the bleu cheese crumbles and the shredded cheese over the chicken. Top with the chopped green onions.

Take the hot pizza stone out of the oven and transfer the pizzas on the parchment to the stone and bake for about 10 minutes. The buffalo pizza will need a bit more time to fully cook than the cheese one so you can always cut the parchment paper in half and take out the cheese pizza after about 8 minutes and then let the buffalo pizza cook for another 4 minutes, or so. I didn't do this; I just let the cheese pizza get a little browned since Computer Man actually likes that sort of thing. Serve with a crisp salad!


Saturday, February 13, 2010

Dad's Famous Bagelwiches

No, we don't have children yet. No, this isn't a public announcement that we're pregnant. These are just some delicious breakfast sandwiches that my husband proudly developed, and we've always said how much fun it will be when we have children to have "Dad's Famous Bagelwiches" on Saturday mornings with our coffee and cartoons. I loved waking up to breakfast on Saturday mornings--especially when my mom had made some delicious cinnamon roll or other frosted treat. I even enjoyed having bowls of cereal because I liked to line up the boxes in front of me and play all the games on the back. I especially loved a good breakfast burrito with chorizo and eggs or a hearty omelette stuffed with cheese and ham. Man, I miss living at home with Mom to cook for me all the time! At any rate, I do look forward to creating those kinds of delicious memories for our own children...someday, just not today! Please feel free to modify the following recipe in any way you'd like; I've added some of my own suggestions at the bottom!

Dad's Famous Bagelwiches
Source: Mario, my Computer Man

2 Everything bagels
4 slices of ham
2 eggs
2 slices of cheddar or American cheese
1 T butter (the real kind)

Toast the bagels to your desired done-ness. Meanwhile, melt the butter in a skillet. Crack the eggs and add each of them one-by-one to the skillet. Lightly season each with salt and pepper. Fry them according to your desired done-ness (I like over-medium, but Mario likes sunny side up). Put the fried egg on the bottom half of the bagel. Fry the slices of ham (2 in each stack) for a minute, or so, on each side in the same pan that the eggs were in. Once the ham is a bit crispy around the edges, put a slice of cheese on each stack and allow to slightly melt. Transfer the ham and cheese to the bagel, right on top of the egg. Put the top half on, cut in half, pour a glass of coffee or OJ, and enjoy!

Other serving suggestions:
-turkey
-canadian bacon
-regular bacon
-swiss or Gruyere
-white cheddar
-feta
-plain bagels
-onion bagels
-add cream cheese to the bagels (I prefer this, but Computer Man always forgets it)
-top cheese with fresh spinach
-roasted red pepper
-sliced tomato


(He forgot the ham this time around...it's still delicious without!)

Monday, January 25, 2010

Green Chile Chicken Enchiladas

Friends come in stages; many of the friends I had as a little girl are not the same friends that I have now as young adult which will likely not be the friends I have when I'm 60. But, there are few friends I KNOW will be around forever. One of these such friends is Kalene; we've been best friends since junior high. Another is Summer. We didn't meet until college, but I know we'll be the best of friends forever. Enter, Green Chile Chicken Enchiladas! I went over to Summer's mom's house one night, and getting together with Summer and her mom means lots of good food, lots of fun, and lots of laughs. Her mom, Judy, is a wonderfully creative stamper/scrapbooker and an amazing chef. Summer also loves to cook. She and I developed our love for cooking from our moms, so we immediately had a connection. When Judy made this for dinner I immediately demanded the recipe. It is so rich and creamy and not one of the flavors overpowers another. When Summer and I get together we usually end up complimenting each other's talents perfectly: she always takes care of the dessert while I prepare the savory dishes. Enjoy this recipe with your favorite Mexican rice (I either use a box or go to my local Mexican restaurant...although I should learn to make it soon!).

Green Chile Chicken Enchiladas
Source: Judy
Serves: 6
2 chicken breasts, cooked and shredded (or 1 can of canned chicken)
1 16 oz. container of sour cream
3 c. shredded Mexican style cheese (a combo of Monterey Jack and cheddar works)
1 4 oz. can diced green chiles, like Ortega chiles, do not drain
2 cans cream of mushroom soup
12 corn tortillas
8 green onions, diced
1/2 tsp. salt

Preheat oven to 350. Combine the cream of mushroom soup, the sour cream, the chicken, the green chiles, and the salt in a large bowl. Mix well to blend flavors. In a 9x13 baking dish, spoon enough of the sour cream mixture to coat the bottom. Warm the tortillas in the microwave for 30 seconds, or until they're all warm enough to roll without breaking. Fill each tortilla with some cheese and green onions--leave some behind for topping; roll and place seam side down on the bottom of the baking dish. Cover the filled tortillas with the remaining sour cream mixture and top with the rest of the cheese and green onions. Bake for 25-35 minutes until cheese is melted and the dish is bubbling. Enjoy with rice!

Wednesday, January 20, 2010

Holiday (or Everyday!) Cheeseball

So many people have the preconceived notion that cheeseballs are lumps of over-processed junk--which they usually are--and are always left untouched at parties. This recipe, however, is always the first thing to be devoured at all my family parties. Pictures to come!

Cheeseball

2 (8 oz.) pkgs. cream cheese, at room temp.
8 green onions, sliced into small rings
4 oz. dried beef (Carl Buddig is best), chopped
4 tsp. Worcestershire sauce
1 cup shredded cheddar cheese

Chop beef and green onions. Mix the beef, green onions, Worcestershire, cream cheese, and 3/4 cup cheese. Turn out onto a piece of wax paper and form into a ball. Roll it in the remaining 1/4 cup cheese. Transfer to a plate, cover with plastic wrap and let chill in refrigerator for 2 hours. Bring out of fridge at least 20 minutes before serving to allow it to soften a bit. Ritz crackers, wheat thins, club crackers, or Triscuits are the best choice of crackers to serve with it.

Monday, January 18, 2010

Cheesy Potatoes 'n Ham

I guess I'm craving comfort food because all that I've made today has been my mom's recipes! I think it's sad that I have to live so far away from my family, but that's life! I got the following recipe when I was 10 years old from my neighbor. I went to their house for dinner one night and then immediately ran home with the recipe and gave it to my mom. She, of course, adapted it to suit our family's tastes, and since then this recipe has been at the top of my request list. I made it for my husband when we were newly married and it now tops his request list! I hope you enjoy it as much as I do!

Cheesy Potatoes (a.k.a Cornflake Hotdish)

1 (32 oz.) bag cubed hashbrowns--thawed 3o min. at least
1 can cream of chicken soup
8 oz. sour cream
8 oz. shredded sharp cheddar cheese
2 c. crushed cornflakes
1/2 stick melted butter
1/2 tsp. salt
1/2 tsp. pepper
6-7 slices cooked ham (lunch meat)

Mix potatoes, soup, sour cream, cheese, ham, salt, and pepper together in a large bowl. Pour into a greased 9x13 glass baking dish. In another bowl, melt butter in microwave. Toss the crushed cornflakes in the melted butter and sprinkle on top of hashbrowns mixture. Bake at 350 for an hour until bubbly and cornflakes are browned. Serve hot. Delicious as leftovers the next day!


Wednesday, January 6, 2010

Mmmmmmmmac n' Cheese n' Dogs!

I grew up with the kind of mother who made sure dinner was homemade and delicious every night and the kind of father who worked hard to make sure there was sufficient funds for food. My sister and I never worried about if there would be enough of the traditional comforts at home, and were grateful that we were occasionally afforded a few luxuries. As a middle school teacher and student myself, I don't have an abundance of time, but I do enjoy making a some favorite comfort foods when the opportunity arises. Enter, Pioneer Woman's Baked Mac and Cheese, the kind of dish that would please my parents: homemade, delicious, cost-effective, and comforting.

I was sifting through the recipes over at Annie's Eats when I stumbled across this fantastic recipe. Now, I love Pioneer Woman immensely, but I've never tried any of her recipes! There's a first time for everything, right?! So, with the husband in class, an empty house, and a grocery cart full of the necessary ingredients, I set off on this cheesy adventure. I loved making this dish; it was relatively simple but did require my full attention. For me, too, it was educational: I have NEVER tempered an egg--EVER! And this recipe required that successfully temper one! It also asked me to use whole milk and lots of it too boot...I hate whole milk...but it was delicious, though not the kind of dish I can make every night seeing as though my ever-expanding waistline cannot afford much more! Finally, it allowed me to make some adaptions to my own tastes, which I think is the mark of any good recipe. Here's the recipe below--with my own addition: 5 sliced hot dogs!

Pioneer Woman’s Baked Mac and Cheese with Hot Dogs!
Ingredients:

5 hot dogs, sliced
4 cups uncooked macaroni (I like small elbow macaroni, but curly pasta or bow ties would be fun!)
4 tbsp. butter--not margarine
1/4 cup all-purpose flour
2 1/2 cups whole milk
2 tsp. dry mustard
1 egg, beaten
1 lb. cheese, grated (I used all cheddar, but I’m sure a combination would be great too)
1/2 tsp. salt
1/4 tsp. garlic powder
1/4 tsp. onion powder
1/2-1 tsp. ground black pepper
Dashes of cayenne, paprika, and/or thyme (optional) – (I only used cayenne!)

Directions:
Preheat the oven to 350 degrees F. Slice hot dogs and boil them and the macaroni according to package directions until slightly firm. Drain and set aside.

In a large pot (perhaps the same pot in which you boiled the pasta so as to save time on dishes later?!), melt the butter over medium-low heat. Whisk in the flour and cook the mixture for five minutes, whisking constantly and being careful not to burn. Add the milk to the pot, stir in the dry mustard, and whisk until smooth. Cook the mixture for five minutes until very thick. Reduce the heat to low.

Add the beaten egg to a small bowl. Take 1/4 cup of the warm sauce and slowly pour it into the beaten egg, whisking constantly to avoid scrambling the egg. Whisk until smooth. Pour the tempered egg mixture back into the sauce, whisking constantly. Stir until smooth. Mix in the cheese, reserving a handful for topping, and stir until completely melted. Add in salt and other seasonings. Taste and adjust seasonings accordingly. Add the drained cooked macaroni to the pot and mix well.

Pour the mixture into a greased 9x13 baking dish, top with reserved cheese, and bake for 20-25 minutes or until golden and bubbly on top.

Source: adapted from Annie's Eats and The Pioneer Woman.

Mmmmm...shredded cheese...

Macaroni and hot dogs getting delicious and creamy!


Voila! A perfectly scrumdidlyumptious bowl of mac n' cheese n' dogs!

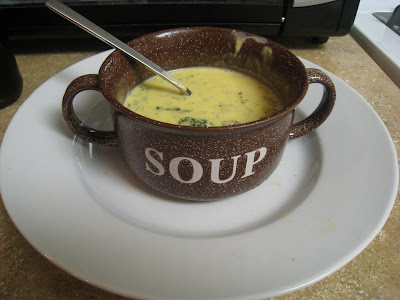
Broccoli Cheese Soup

It's rainy. It's cold. It's Christmas vacation. I'm in the mood for soup. Now, the husband is convinced soup is just not a big enough dinner, but when you have a rich and creamy chowder running down your throat while the rain simultaneously runs down the windowpane is this not sufficient? He still says, No. Okay, I'll budge.

So, tonight I put a delicious pot of Broccoli Cheese soup on and a fine selection of deli meats, cheeses, and spreads to offer Build-Your-Own Hot Paninis! The result: success and content on the part of my husband and our dinner guests. In the end, I felt satisfied with the push to go beyond the bowl of steamy delicious soup. Oh--and, dessert? Monkey bread! But, since I don't bake (much) it was a pre-packaged dessert from the market.

Broccoli Cheese Soup:
1 large section from a shallot, diced finely
4 white ends from 4 green onions, diced (save the green tops!)
1/3 c. butter (it's better than margarine)
1 14 oz. bag of frozen broccoli florets
1 8 oz. block of medium cheddar cheese
1 lb. block of Velveeta cheese
1 32 oz. box of chicken stock
1 1/3 cup 2% milk (less fat makes the soup too runny, more fat makes it more delicious!)
1 tsp. garlic powder
3 heaping tsp. corn starch
1/4 c. water

In a large stock pot, melt butter. Add in shallot and white ends from green onions. Saute until tender. Add in broccoli. Stir and saute a few minutes to defrost broccoli. Pour entire box of chicken stock. Simmer for about 10-15 minutes until broccoli is tender. Meanwhile, shred the cheddar cheese and cut the Velveeta into cubes. Once broccoli is tender, add in both cheeses. Stir in a figure eight shape until cheese melts. Turn heat to medium-low. Add in milk and garlic powder. Allow to heat through entirely. In a separate measuring cup, mix the cornstarch and water. Once cheesy mixture of deliciousness is heated through, add in the cornstarch mixture. Stir constantly until soup is thickened. Serve with a sprinkling of green onion tops. You could even top with bacon bits and sour cream?! Get creative....salsa? More cheese?

Paninis
deli meats--your choice!
deli cheeses--your choice!
bread: the best choices are Sheepherder's and French
spreads like mayo, mustards of various flavors, and cream cheese
sandwich toppers like sliced tomato, lettuce, banana pepper rings, roasted red peppers, chopped olives, pickles, sprouts, or whatever else you like!

Butter the bread and put on a hot panini press. Add your sandwich fillings and toppings, put the other piece of bread on top and press the panini press down. Enjoy alongside the bowl of creamy, delicious, Broccoli Cheese soup!

Here are pictures of the soup...the paninis? Yeah...they were eaten too quickly!


LinkWithin

Related Posts with Thumbnails