Monday, March 29, 2010

Chicken and Rice--Lebanese Style

I have to warn you that the measurements with this recipe are, well, not quite exact. That's because this recipe comes from a Lebanese family. They measure things in coffee cups--Arabic coffee cups. I remember one time my mom wanted a Tabbouleh recipe from Computer Man's mom. Well, after a poor translation, she was adding in AMERICAN coffee cups of things and wondering why there was so much of them! Computer Man laughed his head off and realized he hadn't translated the coffee cup part correctly, and why on earth would she question it? She didn't have any other coffee cups to choose from, so she used the "#1 Dad" mug! Funny stuff. Okay, in hindsight maybe it's not that funny of a story, but it gave us a laugh or two...or three. This made for a wonderful Sunday dinner that will be used many times over I'm sure! Enjoy!

Chicken and Rice--Lebanese Style
Source:
The In-Laws :)
2 Cornish game hens
4 cinnamon sticks
2 T lemon juice
sprinkle of garlic salt (enough to cover top and bottom of chickens)
vegetable oil (enough to cover top and bottom of chickens)
Grill Mates Chicken Rub (enough to cover top and bottom of chickens)
a few turns of the pepper mill
2 cups rice
1 T cinnamon

Preheat oven to 350.
Thoroughly wash the chickens and make sure all the blood and yuck is out. Put the two chickens and the 4 cinnamon sticks in a large stock pot and fill with water; bring to a boil on high. As soon as it starts foaming at the top, use a strainer to remove the foam the pot. After the "first foam," continue to remove the foam for 10 minutes. Remove chickens from pot and let all the water drain out of them. DON'T DRAIN THE WATER FROM THE STOCK POT! Transfer them to a large cookie sheet. Season both sides with oil, lemon juice, garlic salt, pepper, and chicken rub. Bake in oven until the side that's facing up is browned; flip them over and do the same thing. It takes about 1 hour and 30 minutes to cook these bad boys. While the chickens are cooking, put 1 T vegetable oil in the bottom of another pot on medium high. Scoop out the 2 cups of rice and put them in the hot oil; stir around to coat evenly. Add in the 1 T of cinnamon and a few sprinkles of salt. Put a strainer over this pot. Using the 1 cup scoop, take out 4 cups of the chicken broth and pour over rice through the strainer. Bring the rice to a boil; cover and simmer until the rice is fully cooked--it takes about 20 minutes, or so. When the rice and chicken are done, pull apart the chickens and place atop a bed of rice on your serving platter. Enjoy and be thankful you get to know a recipe from Computer Man's mother's vault--she rarely shared the secrets behind her cooking!


Friday, March 26, 2010

Cheeseburger Biscuit Bake

One late weekend night I was really mad at myself for not having planned dinner ahead of time! I was so busy grading papers and doing homework and before I knew it, it was time for dinner. I frantically searched through my fridge and pantry and a recent Valentine's Day gift from my mom (Pillsbury cookbook) and struck gold! I adapted the following recipe according to the availability of a few ingredients. I was really nervous about this dish because of the newness of it. I actually stood waiting for Computer Man's reaction. Success! He actually loved it and, despite being stuffed, went back for seconds. This meal came in at just about $10--maybe $11. I recommended it to a friend who has three children and she was ecstatic at the taste and affordability of this dish! Enjoy! Cheeseburger Biscuit Bake Source: Adapted from Pillsbury AnnualRecipes 2010 Yields: 6 servings

1 lb ground beef
1/4 yellow onion, chopped
2 dill pickles, chopped (next time I might even do 3 because I like pickles a lot)
1/4 cup water
1/2 cup ketchup
1 T yellow mustard (you can just do a big squeeze into the pan, don't measure this out--it takes too long)
a sprinkling of salt and pepper
2 cups shredded cheddar cheese
1 can (8 biscuits) flaky layers biscuits
1 egg, beaten

Preheat oven to 365. Brown the onions and ground beef together in a pan until the beef is fully cooked. Add in the water, ketchup, mustard, pickles, salt and pepper. Stir together and cook for about 5 minutes. Transfer the beef mixture to an ungreased glass baking dish (2 quart, or 11x7). Sprinkle cheese on top evenly. Separate the 8 biscuits from each other and then separate each biscuit in half by tearing apart at the middle layer. Arrange the biscuits on the cheese; use all the biscuits. If you have too many biscuits, just overlap a few, but make sure the cheese is fully covered; you can tear biscuits in half if you need to. Beat the egg and brush on top of the biscuits--this will give it a golden brown topping. Bake for about 30 minutes uncovered until the biscuits are a deep golden brown and fully cooked.
You could also add in a can of corn or mixed veggies when you add in the ketchup and other ingredients; just increase the water amount by 1/4 cup then. I served mine with a bag of salad I got from Fresh and Easy for 98 cents!


Thursday, March 25, 2010

A Double Pizza...Again

Have I told you already that Computer Man doesn't like the same kinds of pizza toppings as I do? Well, it happened again. I wanted a cheesy, olive-y pizza, and he just wanted ham and mushrooms. Oy. It is so easy to do so it's not really that big of a deal, it just doesn't make for very pretty pictures...yes, I have spoken to someone about the perfectionist in me... This is definitely the kind of recipe you'll want to save for a night when you have a bit more time to spend in the kitchen! Enjoy!

A Double Pizza
Source:
Me

1 pizza dough
1/2 cup pizza sauce
1 3/4 cups mozzarella cheese plus 1/4 cup sprinkling of cheddar cheese
1 small can mushrooms
5 slices honey ham lunch meat, chopped
1 small can black olives
a few pieces pepperoni, ripped in half

Preheat oven to 500; heat pizza stone with it and allow the pizza stone to heat for at least 45 minutes. If you don't have a pizza stone you can just use a sheet pan but you don't have to heat it up for 45 minutes. :) Okay, stretch the pizza dough out on a sheet of parchment paper or wax paper. Spread the sauce on top, sprinkle with the two cheeses. Top one half with the mushrooms and ham. Top the other half with the olives and pepperoni. Pop in the oven and allow to back about 10-12 minutes, or until cheese is melted and heavenly.

Wednesday, March 24, 2010

Cheesy Ravioli with Veggies

Having been on a pasta kick, I thought I'd continue the pattern and add another simple, yet delicious pasta recipe to my repertoire. "Repertoire" sounds like too fancy a word, though, to use with this dish. It was so simple and so inexpensive! Being married just four years and living on a teacher's salary means meager meals every once in a while. But, both of our parents taught us that there are times when you have to pinch pennies so that things are a little easier later on. This sort of dish is perfect for those penny-pinching seasons. This meal came in just under $10 and was a hit on a late night after work. Thanks, Parents, for the good lessons!

Cheesy Ravioli with Veggies
Source:
Taste of Home Pasta
Yields: 6 servings

6 quarts water
1 package (16 oz, or so) frozen California-blend veggies (carrots, broccoli, cauliflower)
1 package (25 oz, or so) frozen cheese ravioli
1/4 cup butter (the real kind), melted
1/4 tsp seasoning blend like garlic salt, Mrs. Dash, or Italian seasoning
1/4 cup shredded parmesan cheese--the real kind

In a stockpot, bring water to a boil. Add the vegetables; cook for 5 minutes. Add the ravioli. Cook 5 minutes longer or until both are tender. Drain and transfer to a large, flat serving bowl.

Gently stir in the butter. Sprinkle with the seasoning blend and cheese. Serve with a crisp salad.

Tuesday, March 23, 2010

Wheely Good Pepperoni Pasta

Something about wagon wheel pasta makes me feel like I'm a kid again. Or, maybe it's the fact that the wagon wheels remind me of my 4th grade Oregon Trail project I did with my dad out in the garage. We--well, he--traced and cut little sideboards, a hitch for a yoke, and wagon wheels out of pieces of wood. Then, we fashioned a canvas roof for the wagon, got some plastic oxen, and my mom made little flour and sugar sacks out of scrap fabric. I remember sitting in the garage with my dad trying to put that wagon together, not doing a very good job but knowing that Dad'll fix it. I was either busy daydreaming about creating my next big rollerskating routine I would do in the garage to the Lion King soundtrack, or I was spinning around aimlessly on the bar stool while he put my school project together. And I'll bet I waited until just days--or even the night--before to tell him I needed help on this project. Gotta love childhood...right, Dad?! Anyways, back to the pasta. I threw this dish together quick one weeknight and found it to be satisfying. There are a few changes I will make next time and I've made sure to adjust the recipe below to match those changes. I also halved the recipe when I made it, but I did not note those changes below. Enjoy this hearty, yet simple, pasta dish!

Wheely Good Pepperoni Pasta
Source:
Taste of Home Pasta
Yields: 6-8 servings

1 pound ground beef (I was even considering substituting hot dogs instead, maybe 5 hot dogs?)
1 medium yellow onion, chopped
1 medium green pepper, chopped
1 garlic clove, minced or one tablespoon garlic from the jar
1-28 oz jar. spaghetti sauce
1-4oz can mushroom stems and pieces, drained
1-3 1/2 ounce package sliced pepperoni
8 oz. uncooked wagon wheel pasta
1 cup shredded mozzarella
1 cup shredded provolone cheese (I used shredded asiago instead because I couldn't find shredded provolone)
grated parmesan...the real stuff!

Directions:
Preheat oven to 400. Boil the pasta only part of the way for just a few minutes so that there is still a bite to it; it shouldn't be mushy but it shouldn't be straight out of the box. Meanwhile, in a large skillet, brown the beef, onion, and green pepper over medium heat until meat is no longer pink. Add garlic; cook 1 minute longer. Add the spaghetti sauce, mushrooms, and pepperoni.

In a greased 9x13 baking dish, layer the ingredients as follows, and then repeat:
-half the meat mixture
-half the pasta
-half of the shredded mozz. and provolone or asiago
Sprinkle with the grated parmesan.

Bake, uncovered, at 400 for 30-35 minutes or until heated through and the cheese is bubbly and golden. Let stand for about 5-10 minutes before serving.

Friday, March 12, 2010

Good Ol' Sloppy Joes

I've heard them called BBQs, Taverns, and Sloppy Joes; I've even been slightly offended at having them called Manwiches. But, above all, I call them delicious. I love the simplicity of a Sloppy Joe sandwich. I used to love sitting down to a quick dinner with the family before a band or choir concert because my mom would effortlessly "just throw things together" in pan and call it dinner. We'd have fun things like chili cheese hot dogs, macaroni and cheese, or Sloppy Joes. On a semi-unrelated note, my mom has a funny way of cackling-laughing through a lot of things, but then again, I don't sugarcoat too much. I just kinda ask things straight up. So, when I asked her for the secret to making the perfect Sloppy Joe, she cackle-laughed through the following recipe. I realized how ridiculous it was to ask for a secret recipe like this when it was so, so easy! This makes a great weeknight dinner, and I hope you enjoy it!

Good Ol' Sloppy Joes
Source: Me and Mom

1 lb hamburger
1/2 cup ketchup
1/2 cup brown sugar
2 T mustard
2 T vinegar
salt and pepper
2 chopped dill pickles or dill pickle relish
4 burger buns

Brown hamburger in a skillet; season with salt and pepper. Once meat is totally browned, add the ketchup, brown sugar, mustard, and vinegar. Turn the heat up to medium-high and stir together the browned meat and other ingredients. Allow to simmer for 5-7 minutes. After that time, taste to decide if you want it sweeter (more brown sugar), tangier (more vinegar--not mustard), saltier (more, well, salt!), or if it's just perfect. Turn the heat down to low. Meanwhile, chop the pickles and slice the buns. Spoon the Sloppy Joe meat onto the buns and top with the chopped pickle. Serve with tater tots, fries, chips, or your favorite pasta or potato salad! Enjoy!

Thursday, March 11, 2010

Prosciutto Tortellini

I love standing in line at the grocery store thumbing through magazines; sometimes the magazines are about home decorating, sometimes they're trashy, but most of the time they're food-related. I also love the mini food magazines that are chock-full of recipe cards. I scored big time recently when I picked up a copy of Taste of Home's Pasta Recipe Cards magazine. I have already marked about 80% of the recipes to try! The next day we went to get the ingredients for a few of the dishes. It was a great success. Computer Man ran to the store to grab one of those uber-convenient rotisserie chickens while I whipped this dish up. The timing was perfect, the flavors simple yet delicious, and the meal totally satisfying!

Prosciutto Tortellini
Source: TOH Pasta

1-19 oz pkg frozen cheese tortellini
1 T flour
1 cup half-and-half
1/2 shredded mozzarella
1/2 cup shredded Parmesan (the good stuff; not the shakeable junk)
10 thin slices prosciutto, chopped
1-10 oz pkg frozen peas
salt and pepper

Cook tortellini according to package directions; cook the peas with the tortellini to take some of the bite off. Meanwhile, in a large skillet, combine flour and cream until smooth; stir in the cheeses. Bring to a boil; cook and stir for 2 minutes or until thickened. Reduce heat. Drain tortellini and peas. Add to the cheese sauce. Stir in prosciutto and cook for 5 minutes or until heated through. Turn off heat. Season with salt and pepper to taste. Serve with a rotisserie chicken or just by itself!

Wednesday, March 10, 2010

Berry Delicious Dessert

I love the flavors of summer. Unfortunately, California has been suffering from torrential downpours lately so things like sunshine have been sparse. The clouds haven't put a damper on my love for summer fruits and desserts that can be made from them. I love the fact that fruits can be found year-round in the freezer. Frozen fruits (and veggies) are usually just as healthy as fresh fruits since they're frozen at the peak of their freshness. We were strolling through Fresh and Easy one afternoon and saw bags of berry medleys and strawberries. We grabbed one of each, a tub of Cool Whip, and an angelfood cake. Voila! This was such an easy dessert that will be so much more delicious in the summer with fresh fruits. I'll definitely do this again come June!

Berry Delicious Dessert
Source: Me

1 angelfood cake
1 tub of Low Fat Cool Whip
1 bag frozen berry medly
1/4 cup sugar or Splenda

Allow fruit to fully defrost in a glass bowl. Pour sugar on top and let sit for at least a half hour, mixing occasionally. After 30 minutes there should be a good amount of berry liquid in the bowl. Slice the cake into whatever size slice you prefer, top with a couple of spoonfuls of berries, and a dollop of Cool Whip on top. Enjoy!


Sugar draws out the natural juices in the berries!


Yum, yum, yum!


Playing with the settings on the new camera!

Tuesday, March 9, 2010

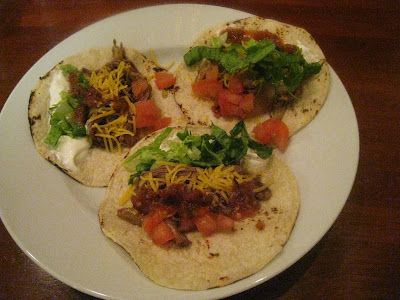
Shredded Beef Tacos

I think I was supposed to be born Hispanic. I don't know why but I have a huge affection towards Mexican food. It doesn't matter: tamales, burritos, tacos, tortas, carne asada, guacamole, salsa, chilaquiles, chiles rellenos, pozole...you name it, I love it. My husband, on the other hand, is not so in love with food from South of the Boarder. He was raised in a home where he ate only Lebanese food, so eating Mexican food is not his idea of fun. BUT, since I cook, I usually get to choose the direction of the meal! One afternoon, I put a tri-tip in the Crockpot with some salsa on top and waited with bated breath for it to be done...10 hours later. What a success! This was such a delicious meal. Well, it turned into two separate meals because I chose to put my shredded beef in taco shells while Computer Man made some instant mashed potatoes (yuck!) and corn to go with his! Oh well, I got my tacos in the end!

Shredded Beef Tacos

1 tri-tip (about 2.5 lbs)
1/4 cup water
1 cup chipotle salsa
1 onion, cut in half and sliced thinly
6 soft taco shells (corn tortillas)
shredded cheese
diced tomatoes
shredded lettuce
sour cream
more salsa

In the bottom of a cold Crockpot layer the onions and the water. Lay the tri-tip on top of the onions and pour the salsa on top of the meat. Put the lid on and set to cook for 8-10 hours. When it's done, heat the tortillas one-by-one on the flame on one of your stove-top burners; heat one side for a few seconds until the edges get a bit browned and then flip and repeat. If you have an electric stove top, let me first say I'm sorry, then let me say that you can put a small pan on medium-high and put the tortillas in the pan and heat on each side. Wrap the tortillas in foil to keep warm or put in a tortilla warmer. Shred up the tri-tip. Put 2 or 3 (or all 6) tortillas on your plate and top with pieces of the shredded beef, cheese, tomatoes, lettuce, sour cream, and salsa. Serve with Mexican rice and enjoy!

Monday, March 8, 2010

Avocado Burger

It's always nice to return to a comforting dish, something that reminds you of the good old days. I got a hankering for a pan-fried hamburger, but didn't feel like dealing with the mess. Luckily, my mom and dad got me a George Foreman grill when I went off to college, and it's been a life-saver many times. In fact, I used to go to my grandma's house every Sunday afternoon for lunch, to do my laundry, and then head off to wait tables in the evening. It was great because we'd get to spend the afternoon together reading Women's Day or watching Lifetime movies. She always made something delicious for lunch; Grandma is known for her amazing cooking. Things like Chicken Pot Pie, Scalloped Potatoes and Ham, Pot Roast, and Fried Chicken made regular appearances on our Sunday lunch table. And sometimes, she would get out a couple of hamburger patties and throw them on the George Foreman. A simple slice of American cheese would melt across the top on its way to being smashed between two warmed burger buns. So, one night I got out my George Foreman and put together a couple of delicious burgers for Computer Man and me. In an effort to make things a bit more interesting, I toasted some extra sourdough bread and sliced up an avocado. This made a quick and easy weeknight meal!

Avocado Burger
Source: Me (and Grandma)

1 lb. ground beef
Lawry's Season Salt
1 ripe avocado
4 leafs romaine lettuce
1 large tomato sliced into rings
4 slices sharp cheddar cheese
mayo
mustard
ketchup
red onion, sliced into rings
4 slices extra sourdough bread
butter

Separate the burger into 4 equal portions. Shape each portion into a round burger patty, about 1/4-inch thick. Season one side with the season salt. Place the seasoned side down on a hot George Foreman grill (or in a frying pan on medium-high heat). Season the other side with the season salt. Meanwhile, cut the sourdough bread in half. Butter one side of each of the halves and put under the broiler for just a few moments--watch it because they'll burn quickly! If you're using a frying pan, flip the burgers. Slice the tomato, wash the lettuce, slice the avocado and set aside. Once your burgers are cooked to the desired doneness, pull off the grill and put a slice of cheese on each burger. Put some mayo on one of the toasted halves of sourdough bread. Put the burger on top, squirt some ketchup and mustard on, and layer with the avocado, red onion, tomato, and lettuce. Top with another half of the sourdough bread. Serve alongside your favorite french fries! Enjoy!

LinkWithin

Related Posts with Thumbnails