Thursday, February 25, 2010

Hawaiian Pizza

Computer Man is from New Jersey which means pizza can only be eaten if it is greasy, cheesy, and foldable. "It's all about the fold." I don't get it. I prefer a thick, bubbly crust, lots of cheese, a pile of veggies, and the perfect sauce; I say, "It's all about the cheese and sauce." I think it's weird to fold a pizza. You fold things like laundry, paper, eggs into batter, and your arms when you're upset. You don't fold pizza. But, alas, he's an East-coaster and they're not too keen on changing. So, when it comes to making pizza in this house, I worry because I haven't mastered the foldable pizza. I was nervous with this recipe since it was totally made up in my head; I usually rely upon cookbooks and other food blogs as my sources of recipes. This pizza smelled delicious both before and after it was cooked, and it looks pretty, too! I waited eagerly for Computer Man's reaction...wait for it...wait for it...THUMBS UP and an, "Oh my GOSH!" I love it when I have a successful night in the kitchen with a brand new recipe. I actually made half the pizza with wheat dough and the other half with traditional white dough since Computer Man's tastes aren't inclined toward wheat. But, luckily, I was able to convince him to try a bite of the wheat dough and he actually liked it! Overall, the pizza is sweet and savory and the flavors blend together perfectly so that no one flavor overpowers any other. Please enjoy this as much as we did!

Hawaiian Pizza
Source: Me
Yield: 1 pizza

Ingredients:
1 pizza dough
2 cups mozzarella
1/8 cup bacon bits
7 slices honey ham lunch meat, diced
1/2 cup pizza sauce (I used a heaping 1/2 cup)
1/2 - 1 cup diced pineapple (depends on how much pineapple you want; I used chunked pineapple from the can and just cut it into smaller pieces)
a sprinkling of freshly shredded parmesan cheese

Directions:
Put your pizza stone in the oven and preheat to 500 degrees. Allow pizza stone to sit in hot oven for at least 30 minutes. Meanwhile, sprinkle some flour on a piece of parchment paper. Work your pizza dough out on the parchment paper to the size of your pizza stone. Pour the pizza sauce on and spread around, leaving about 1/2 inch border around the edge. Sprinkle the shredded mozzarella on the sauce. Top with the diced ham and pineapple. Sprinkle with the bacon bits and the shredded parmesan. Get the pizza stone out of the oven and put the parchment paper containing the pizza on the stone. Bake for about 10-12 minutes, or until the dough is golden brown and the cheese is bubbly and delicious. Enjoy with a salad and your favorite soda!


Wednesday, February 24, 2010

Paninis

A few years ago I requested a panini press for Christmas. I was on a big panini kick and thought the only way to make them successfully would be on a panini press. Surely I couldn't just use a pan and a brick--no way, too indigenous! My parents so graciously listened to my countless hints and blessed me with a Cuisinart grill and panini press. It's the perfect tool because the grill plates are interchangeable; I can put the ridged plates on to create the perfect grill lines on sandwiches, hot dogs, burgers, chicken, steak, etc. Or, I can put the flat plates on, open up the lid to create a long, flat cooking surface that I can cook pancakes, or really anything else for which I need a large surface. I love it! My husband also loves paninis, so he was the one who actually requested them for lunch after church one Sunday. Of course, since his tastes are a bit less adventurous than mine, he wanted a simple ham and provolone on sourdough, while I opted for a provolone and roasted red pepper. Both were the perfect combination of flavors and I was glad for his suggestion! If you've got a panini press, get creative with what you put in between those two pieces of bread! Enjoy!

Roasted Red Pepper and Provolone Panini
Source: Me

2 slices of extra sourdough bread
butter
mayo
2 large roasted red peppers from a jar
2 slices of provolone cheese

Turn the panini press on to medium-high. Butter one side of the bread and lay on the press (it's okay if it's not heated up yet). Spread some mayo onto the bread and layer with the roasted red pepper and provolone cheese. Spread mayo on the other half of bread and lay on top of the cheese. Spread some butter on the top of the bread, close the panini press lid and allow to grill until there are golden brown lines in the bread and the cheese is melted and oozing out the sides a bit. Enjoy with a handful of your favorite chips, veggie sticks, or salad.


Tuesday, February 23, 2010

Dilly Crackers

Don't you just love how certain smells or tastes trigger memories? This certainly happens for me quite frequently--especially when it comes to food! ;) I don't normally crave certain foods "out of season," but these little bits o' heaven are a year-round desire. My parents, sister, and nephew came to visit us for Christmas and with family comes comfort food. I saw that my sister had a baggie full of these favorite holiday crackers so I immediately stole the bag so I could enjoy them all to myself. Well, in walked my husband who inquired as to what was in the bag. I reluctantly told him that they were crackers that we had on hand every holiday season since the beginning of time. Since he found out that they were made by my mom, he knew they'd be delicious, so he stole the bag from me and downed a few handfuls. His eyes lit up and he said, or tried to say, "Moh my moff, you maff to make fese!" Unfortunately, I never got around to making them, and I thought all had been forgotten about his obsession with the crackers until a package arrived from South Dakota. Computer Man quickly opened it up; he discovered a hilarious birthday card for him, a fun new cookbook for me (a Valentine's Day gift), two jars of creamed honey (a particular brand only available in South Dakota), AND a bagful of Dilly Crackers! So, my mom deserves the credit for this posting. Thanks, Mom!

Dilly Crackers
Source: Mom

2 (12 oz.) packages/boxes oyster soup crackers
1 1/2 cups vegetable oil
1 T dill weed
1 T lemon pepper
1/4 tsp. garlic powder
1/4 tsp. onion powder
1 package Hidden Valley ranch dressing mix

Put crackers in a large bowl. Combine the rest of the ingredients in another bowl and then transfer to the food processor; blend thoroughly. Pour mixture over crackers and stir well. Bake at 200 degrees for one hour on a large sheet pan. Stir every 15 minutes to ensure even browning.


Monday, February 22, 2010

"Oh, boy!" Waffles

I love the cookbook my mom made for me before I went off to college; it contains all of my favorite dishes from my childhood as well as few bonus ones. I like thumbing through the pages and reminiscing about the evenings around the dinner table. We'd begin each dinner meal by praying, "Come, Lord Jesus, be our Guest, and let these gifts to us be blessed." It was such a simple prayer that was easy for two small girls to memorize--two girls who were responsible for praying for the food each night. I didn't realize until adulthood the significance of those words and of the awesome responsibility that we were given to say them. I love the cookbook, too, because it contains funny little quips that my mom says, and since I can't see or talk to her every day, I can just read the cookbook and hear her saying them and then cackling afterward. We picked on my mom for cackling--not laughing. I wish we wouldn't have because, well, now I find myself cackling! Ahh!

At any rate, I knew that I wanted to bless my husband with these waffles on a Saturday morning, so I woke up extra early to make sure they were ready when he got up. Such a blissful memory...except that I was out of eggs and didn't have the waffles ready in time before he had to leave for work. Alas, I carted them to the office so he could enjoy them a bit late. He still enjoyed them. I also requested that he say, "Oh, boy!" because every time I eat these waffles, I feel compelled to do the same--not just because that's their name, but because they really are delicious! When it comes to waffles, I love the task of making sure the right amount of butter lands in the little squares, and then shortly thereafter watching the hot maple syrup drip over and fill up those buttery little squares to the brim. It's really the simple things in life that thrill me. I suppose that even the idea of a waffle maker is a bit entertaining, but I digress. Please enjoy these childhood favorites, and don't forget to say, "Oh, boy!" aloud!

"Oh, boy!" Waffles
Source: Mom
Yield: about 16 waffles, depending on your size of waffle iron (I used a Belgian waffle maker).

Ingredients:

2 1/4 cups flour
4 tsp. baking powder
3/4 tsp. salt
1 1/2 tsp. sugar
2 beaten eggs
2 1/4 cups milk
1/2 cups vegetable oil
1 1/2 tsp. vanilla

Directions:
Sift together the first four ingredients in a large bowl; set aside. Beat the eggs in another bowl with a fork. Add the milk, oil, and vanilla to the eggs and whisk together well. Pour the wet ingredients into the dry ingredients and beat together with the whisk until just moistened. Don't overbeat otherwise the waffles will be rubbery and tough. Bake in a preheated waffle iron. Serve immediately with butter and maple syrup, butter and light or dark corn syrup, butter and powdered sugar and strawberry preserves, or any other fun toppings you'd like!


Thursday, February 18, 2010

Vote for me!

February 17th began like any other morning: check updates on Annie's Eats, Cooking in Cucamonga, Pioneer Woman, check my Facebook updates, check my e-mail. But, my Gmail inbox was a bit peculiar that morning. I said to myself, "Self, who is this Melissa and why is she e-mailing me from Foodista, only the best cooking encylopedia?" I opened up dear Melissa's e-mail only to read the following:

Hello,
Looking for Blueberry Streusel Coffee Cake led me to your blog post:
http://justplayingwithfood.blogspot.com/2010/01/blueberry-streusel-coffee-cake.html
I work for Foodista.com, the online cooking encyclopedia everyone can edit. We are looking for recipes to feature in our upcoming Foodista Best of Food Blogs Cookbook.
If you would like the chance to have your recipes published in a cookbook, enter them into the Foodista Best of Food Blogs Cookbook competition. But hurry, the deadline is February 28th, 2010!
http://www.foodista.com/blogbook?src=bo_3
Please let me know if you have any questions, I'm happy to help. I look forward to seeing you soon in the Foodista kitchen!
Cheers,
Melissa
Editor and Community DeveloperFoodista.com -- The Cooking Encyclopedia Everyone Can Edit

I was completely shocked! I know it doesn't mean that I won, but MY blog? MY blog with just 4 of you faithful followers?! I quickly sent off my Blueberry Streusel recipe (that actually belongs to my mom) and now I sit with my fingers crossed! :) Vote for me!

Wednesday, February 17, 2010

Herbed Chicken and Creamy Orzo

WOW! WOW! WOW! What an easy, delicious, and satisfying dinner this was! I've been busy helping Computer Man get his new business up and running so making an intricate dinner just wasn't in the cards. I knew I had to get something hot on our plates, and quickly too! Well, this dish certainly took center stage. I hadn't even defrosted the chicken and this dinner still came together in about 30-40 minutes. You won't be disappointed by the subtle, yet distinct, flavors this dish has to offer. The chicken remains moist and succulent while the orzo and vegetables act as the perfect accompaniment. All in all, the flavors blend together perfectly and you feel like you're getting a very healthy and appetizing meal at the same time. I wish we would've had a nice cucumber and lettuce salad to go with this to round out the vegetable servings, but, alas, I just didn't follow through! I hope you enjoy this as much as we did!

Herbed Chicken and Creamy Orzo
Source: Annie's Eats

2 boneless, skinless chicken breasts, cut in half like you'd cut a bagel so you have a top half and bottom half [basically, the chicken is getting butterflied but then cut in half totally]
8 ounces orzo pasta
salt and pepper
2 tsp. Herbes de Provence (or do a Google search to find a substitute; garlic salt with parsely would be just fine, too)
3 T olive oil
1 T butter
1 whole shallot, minced
3 cloves garlic, minced
1 14.5 ounce can diced tomatoes UNDRAINED
10 oz. bag of frozen broccoli florets
1/2 c heavy whipping cream
1/2 c freshly grated parmesan cheese (don't use that junk that you shake onto pizza; get the real stuff)

Boil the orzo according to package directions; make sure you salt the water. Defrost (if you haven't already) the chicken in the microwave while the orzo cooks. Once the orzo is done, drain it and return it to the hot pan; put 1 T of the olive oil on the pasta, mix together, put the lid on and leave it set--you'll come back for it in a bit.

In a large 12- or 14-inch skillet, heat the remaining 2 T of olive oil over medium or medium-high heat. Season the face up side of the chicken with salt and pepper and some of the Herbes de Provence. Transfer the chicken--seasoned-side down--to the hot oil and then season the other side. Saute each side for about 3 minutes. Then, add in the minced shallot and the 1 T of butter; saute the shallot for about 2 minutes. Add in the minced garlic and saute for another minute. Pour in the diced tomatoes and their juice and the broccoli florets. Turn the heat up to high so as to bring the tomato juices to a boil. Scrape the pan so that you get all the browned bits of shallot and garlic that may have stuck to the bottom. Cover and let cook on medium-low heat for about 10 minutes. Stir in the cooked orzo, the cream, and the parmesan cheese. Mix well so the cheese can melt. Season with salt and pepper to taste and serve immediately with a crisp green salad and your favorite white wine!


Tuesday, February 16, 2010

Buffalo Blue AND Cheese Pizzas

I don't know why but I love spicy foods. I love spicy salsa and I especially love spicy wings. I love the fact that the hot sauce makes me perspire and I love chasing the hot sauce with bread and other sorts of things to try to calm down my tongue. No one understands why I torture myself because it'd be just as easy to not partake in the brouhaha that is my mouth once I'm finished eating. Nevertheless, I'll just continue doing it to myself! I got this recipe from Cooking in Cucamonga but I knew I'd have to do something different for Computer Man who loathes any and all things spicy. Luckily, everything worked out wonderfully in the end: I was able to painfully enjoy my spicy pizza and he devoured his plain cheese pizza (which he, of course, ate alongside a plate of Hawaiian wings). You can totally nix the plain cheese pizza and double everything (except the crust and shredded cheese) to make one large Buffalo Bleu pizza. Enjoy!

Pizza Night! (Buffalo Bleu and Cheese Pizzas)

1 pizza crust
2 cups shredded cheddar and jack cheese
a few crumbles of bleu cheese (less than 1/4 c)
less than 1/4 c bleu cheese dressing
2 green onions, chopped
1 chicken breast, grilled and shredded or diced (I used a George Foreman grill)
4 T hot wing sauce (or more if you want)
1/4 c pizza sauce [not used on the Buffalo Bleu pizza]

Preheat oven to 500 degrees and put the pizza stone in there while it heats up; allow pizza stone to heat for at least 30 minutes--you can prep the pizza while it warms up.

Divide the dough in half and flatten out each half on a piece of floured parchment paper. On one of half, spread the pizza sauce and sprinkle with cheese. You're done with that pizza.

For the other pizza, things are a bit more involved. Mix 2 T of the wing sauce and the bleu cheese dressing together; spread on pizza dough. Mix the grilled chicken with the rest of the wing sauce in separate bowl (I added more of the spicy goodness in this step because I wanted to!). Put the chicken on the dough. Sprinkle the bleu cheese crumbles and the shredded cheese over the chicken. Top with the chopped green onions.

Take the hot pizza stone out of the oven and transfer the pizzas on the parchment to the stone and bake for about 10 minutes. The buffalo pizza will need a bit more time to fully cook than the cheese one so you can always cut the parchment paper in half and take out the cheese pizza after about 8 minutes and then let the buffalo pizza cook for another 4 minutes, or so. I didn't do this; I just let the cheese pizza get a little browned since Computer Man actually likes that sort of thing. Serve with a crisp salad!


Monday, February 15, 2010

Teriyaki Grilled Pork Chops

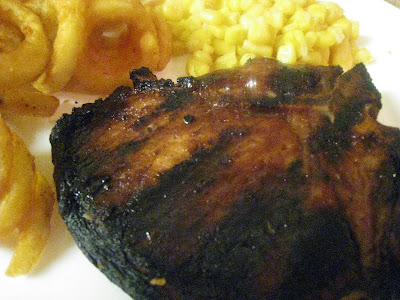
I LOVE when Computer Man agrees to take part in dinner preparation, mostly because it reminds me of my own dad taking part in dinner. I used to think it was so neat that my parents would team up to put together a delicious meal for me and my sister. I love watching Computer Man out on the grill just as much as I love seeing my dad work his magic on the grill. I don't know what it is about men and their grills, but I'm definitely not arguing. For Christmas Eve, Computer Man put two succulent tri-tips on the grill and he was thrilled when my dad complimented him and said it was some of the best he'd ever had! Getting a compliment like that from my dad, the King of the Grill, was a huge deal for Computer Man. So, I put those grilling talents to use again with this particular recipe adapted from Annie's Eats. The pork chop was moist because it still had the bone in it--we don't buy any other kind--and it stood up to the rich teriyaki flavor in which it had been marinating all night long. Next time I'll reserve a cup or so of the marinade and reduce it on the stove to make a sweet teriyaki dipping sauce (I've added that modification in the ingredient list by doubling everything and then explained that step in the instructions). Enjoy!

Teriyaki Grilled Pork Chops

1 1/3 cup soy sauce

2/3 cup firmly packed light brown sugar

1/3 cup water

1/2 cup rice vinegar

6 cloves garlic, finely chopped

2-inch piece fresh gingerroot, peeled and chopped fine (or 1 ½ tsp. dried ginger) -- I omitted this because ginger freaks me out

4 bone-in pork chops

Directions:

For the marinade, combine all ingredients except pork chops in a saucepan. Bring to a boil and stir until sugar is dissolved. Cool the marinade completely. Pour 1 cup of the marinade into a separate bowl, cover and put in the fridge. Put the pork chops in a large resealable plastic bag and pour the marinade over them. Seal the bag, pressing out excess air. Put the bag of chops into a deep bowl that allows the chops to be fully immersed in the marinade. Allow chops to marinate overnight.


When you're ready to grill, dump out the marinade that had the raw meat in it. Grill chops on an oiled rack, approximately 7-8 minutes per side, or until just cooked through. Meanwhile, pour the extra 1 cup of marinade into a saucepan and boil about 5-10 minutes, or until it has reduced. You can also baste the chops with the extra marinade during last 5 minutes of cooking instead of reducing it. Serve with your favorite veggie and starch (we chose corn and curly fries!) and enjoy!


Saturday, February 13, 2010

Dad's Famous Bagelwiches

No, we don't have children yet. No, this isn't a public announcement that we're pregnant. These are just some delicious breakfast sandwiches that my husband proudly developed, and we've always said how much fun it will be when we have children to have "Dad's Famous Bagelwiches" on Saturday mornings with our coffee and cartoons. I loved waking up to breakfast on Saturday mornings--especially when my mom had made some delicious cinnamon roll or other frosted treat. I even enjoyed having bowls of cereal because I liked to line up the boxes in front of me and play all the games on the back. I especially loved a good breakfast burrito with chorizo and eggs or a hearty omelette stuffed with cheese and ham. Man, I miss living at home with Mom to cook for me all the time! At any rate, I do look forward to creating those kinds of delicious memories for our own children...someday, just not today! Please feel free to modify the following recipe in any way you'd like; I've added some of my own suggestions at the bottom!

Dad's Famous Bagelwiches
Source: Mario, my Computer Man

2 Everything bagels
4 slices of ham
2 eggs
2 slices of cheddar or American cheese
1 T butter (the real kind)

Toast the bagels to your desired done-ness. Meanwhile, melt the butter in a skillet. Crack the eggs and add each of them one-by-one to the skillet. Lightly season each with salt and pepper. Fry them according to your desired done-ness (I like over-medium, but Mario likes sunny side up). Put the fried egg on the bottom half of the bagel. Fry the slices of ham (2 in each stack) for a minute, or so, on each side in the same pan that the eggs were in. Once the ham is a bit crispy around the edges, put a slice of cheese on each stack and allow to slightly melt. Transfer the ham and cheese to the bagel, right on top of the egg. Put the top half on, cut in half, pour a glass of coffee or OJ, and enjoy!

Other serving suggestions:
-turkey
-canadian bacon
-regular bacon
-swiss or Gruyere
-white cheddar
-feta
-plain bagels
-onion bagels
-add cream cheese to the bagels (I prefer this, but Computer Man always forgets it)
-top cheese with fresh spinach
-roasted red pepper
-sliced tomato


(He forgot the ham this time around...it's still delicious without!)

LinkWithin

Related Posts with Thumbnails